Contents (click to jump to the section)
New:
1. Streamline
1.1 General Information
1.2 Config Steps – Connect / database
1.3 Payment Flow – Activate
1.4 Refunds
1.5 Balance Check
2. Wizard Item
3. Fixed
New:
- Streamline [ps2id id=’dac-9d’ target=’’/]
1.1 General Information [ps2id id=’wkc-1′ target=”/]
-Streamline is a loaded value payment type that includes ticket balance to be spent within certain expiration time - It works in a form of a purchased ticket (gift card) that is scanned from 1d barcode / entered manually /
– Example usage: the customer purchases a ticket for the game that comes with $10 of loaded value which can be spent
– Streamline payment method is supported on Activate Android in POS regular mode, REST mode, Easy Split and regular splits
1.2 CONFIG STEPS – CONNECT / Database [ps2id id=’w-999′ target=”/]
– enable Streamline on Employee Role = YES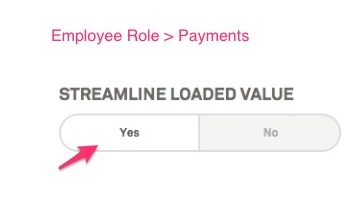
– you can also customize the name of your TinCaps button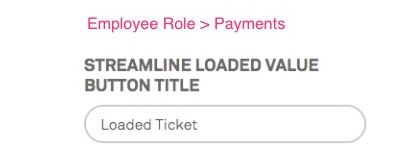
– Database: correct settings of Payment type (Loaded Value) and Payment ID for the Venue. For more tech info reach out respective developers.
1.3 PAYMENT FLOW – ACTIVATE [ps2id id=’990322′ target=”/]
POS FLOW – regular transaction
1. Add some items to the cart
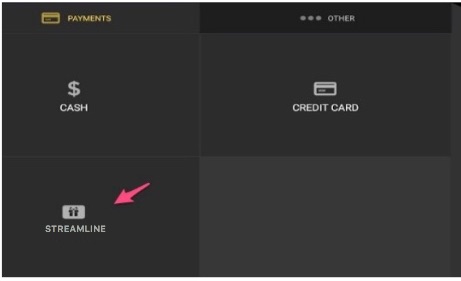
2. Choose Streamline payment type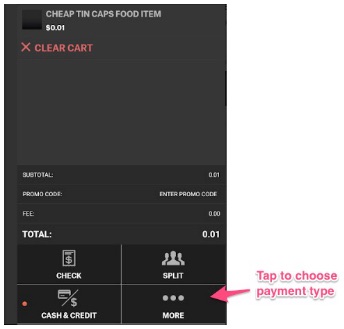
3. Next – you will be asked to enter the amount to be paid.
4. Choose tip (if applicable).
5. After that – provide the card number. This can be done in 2 ways: enter manually ticket number / scan 1d barcode (barcode scanner must be attached).A sample 1d STREAMLINE barcode:

6. Finally, tap the green “Complete order” button to finalize your order.
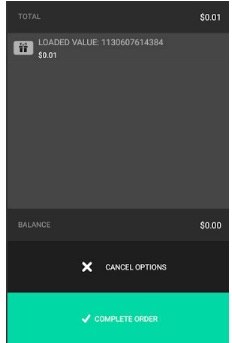
7. Activate will check the balance and if there’re sufficient funds, the item with updated payment type will be displayed in the cart.
If transaction is successul, you will see “Thanks” screen.
Note! For STREAMLINE transactions, Signature confirmation screen is not supported.
1.4 REFUNDS [ps2id id=’oo-11′ target=”/]
For Streamline Loaded Value, refunds are supported and their flow is like for regular orders.
1. Open Activate’s Left Menu and choose “All Orders” view
2. Choose the order that is to be refunded from “Completed”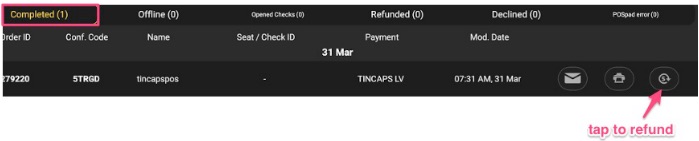
3. Tap the quick refund button and confirm.
4. Result: order is refunded and goes to the “Refunded” tab.And, of course, Connect would reflect the status of your order.

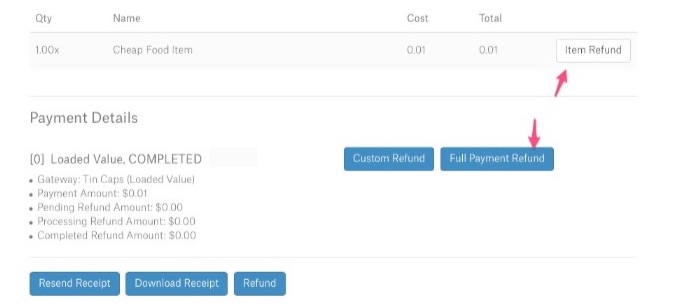
If order has not been refunded yet, Connect would allow to Refund the order / item manually.
1.5 BALANCE CHECK [ps2id id=’kk-102′ target=”/]
Since Streamline is Loaded Value payment, checking card balance is validated every time payment is made. Additionally, there are a few places where ticket can be checked manually.
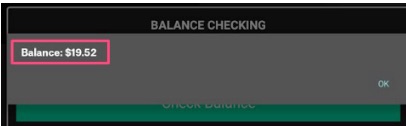
a) Settings Gear
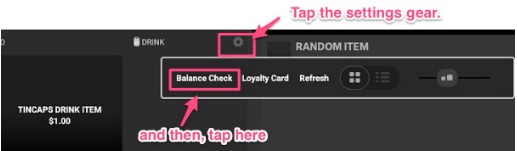 – if there is more than one payment type active for the Venue (i.e. TinCaps and Givex) – Select Payment Method window appears.
– next, type in / scan your ticket number and see the result
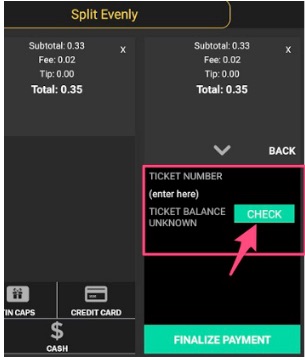
b) Split Mode (regular “Split”).
– Choose “STREAMLINE” for one split payment and check balance.
– Note! Checking balance on Split Mode is possible only by entering ticket number manually
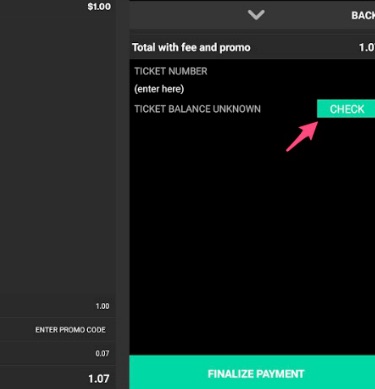
c) Check Orders
– Add some items to the cart and open Check Order. When tapping “Closeout Check” and choosing STREAMLINE payment, balance check is also possible.
– Note! Checking balance on Check Orders is possible only by entering ticket number manually
- Wizard Item [ps2id id=’wiz-223′ target=”/]
Wizard item is a type of item, where modifiers & other special treats are presented in a form of graphic steps.Example:
Hamburger item has wizard enabled.
1. User adds hamburger to the cart.
2. Once the item is tapped, a wizard window with additional items, sauces, beverages etc opens.
3. Next, user needs to go through all wizard steps one by one (it’s not always obligatory to buy the items, but user needs to see all of the steps).IMPORTANT! Wizard item will be ready to use on Activate only when it has some modifiers assigned.To do it, go to Connect > Items > Modifiers > Create. Next, when modifier is created, you need to right click the modifier so that additional options open > Assigned Items tab. In Assigned Items – click “Add Item” button and choose the item that you want to update. You can also add a modifier first, then go to Items > Modifiers tab and right click “Add Modifier”. Wizard Item Configuration (Connect)
1. Go to Connect > Items > Create or use the existing item
2. When item is created / opened, go to Wizard tab
3. First, click “YES” in Wizard Settings/Has Wizard?

4. Next, you need to add wizard steps. Step = individual screen, where certain modifiers are presented.
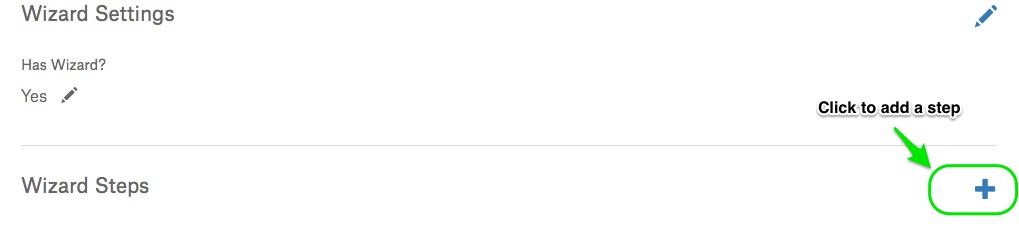
5. Fill in the required fields, enable/disable some options using YES/NO toggle buttons, and finally – assign modifiers. The chosen modifiers will be displayed on one wizard step.

6. Confirm with “Save Step” button. The new step entry will be visible in Item > Wizard > Wizard Steps, and it can always be edited or deleted.
7. Repeat the steps 4-6 to add a new step.
Note!
You can add as many wizard steps as you want.
There is no modifiers limit when it comes to adding them to certain steps.Example:
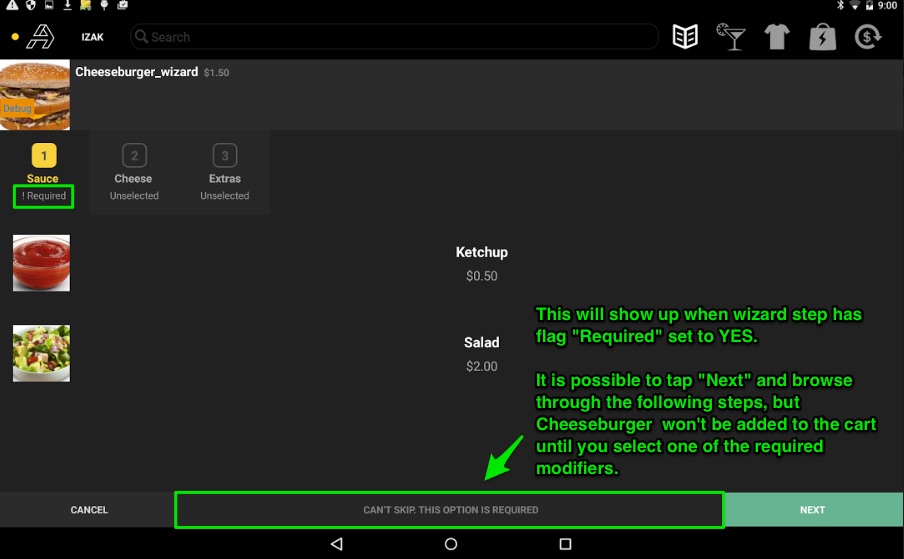
I’ve got 3 wizard steps created and assigned to “Cheeseburger” item: 1.Sauce, 2.Cheese, 3.ExtrasSTEPS:
1. Tap “Cheeseburger” item
2. Wizard steps will show up before adding this item to the cart
Then, I got to step 2 and 3.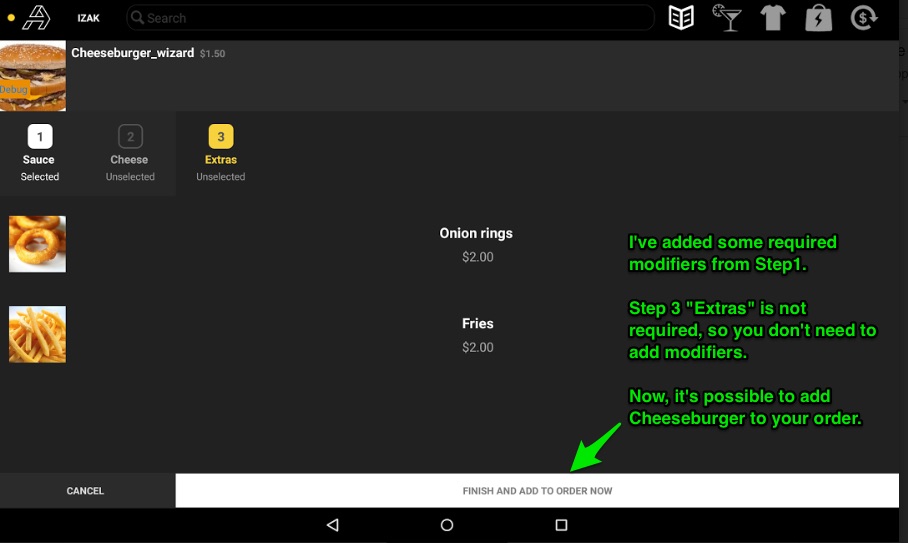
3. When you went through the steps, your item goes to the cart with updated price.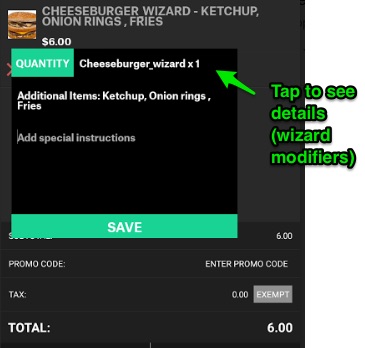
Note! You cannot tap the item from the cart view and edit added modifiers. You can only delete the item and start adding modifiers from the beginning.
Fixed: [ps2id id=’fixed11′ target=”/]
- Wizard items.
- TinCaps (without swipe support).
- Bugs from Yankee Stadium including issues with entering tips.