CONTENTS
New:
1. ROUNDINGS
1.1 General
1.2 Settings
1.3 Rounding – calculations
1.4 Activate changes
2. Streamline
2.1 General information
2.2 Configuration steps
2.3 Streamline payment flow
2.4 Refunds
2.5 Balance Check
New: [ps2id id=’new1′ target=”/]
1. ROUNDINGS [ps2id id=’round1′ target=”/]
1.1 GENERAL [ps2id id=’general1′ target=”/]
-> New way for rounding total sales for cash transactions ONLY (no matter whether there were split or not).
-> Rounding is applied to the sales total only. (Total includes tax and fees) – NOT to individual item prices
-> Note! Rounding can be applied to split payments but ONLY when the chosen payment types = cash. Rounding will not work for mixed split payments, i.e., cash & credit, cash & loaded value. When split payment has been selected, the last cash payment is being rounded and customer sees the change on the last split screen rounded (depending on Connect rounding settings)
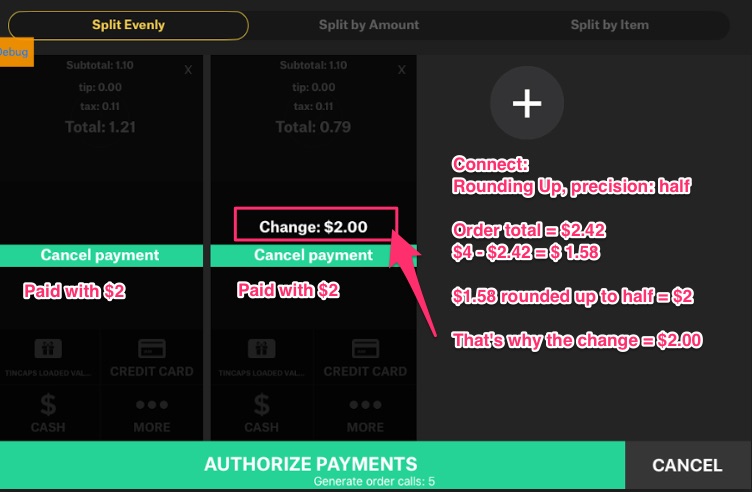
-> Depending on rounding settings (Connect > Venue settings), Activate will add or subtract a value to a total, so that is correctly rounded
-> Transactions can be configured to be rounded down, Up or Up/Down
-> To set cash transactions rounding, go to Connect > Settings -> Venue and choose:
Rounding Type (up/down/up or down) and Rounding Precision (denomination to which total is rounded)
1.2 SETTINGS [ps2id id=’set1′ target=”/]
PRECONDITIONS:
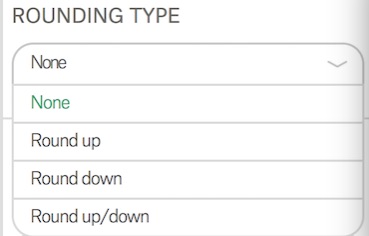
a) Connect > Settings > Venue > General – Rounding enabled (to do it, you need to choose any rounding type)

b) Rounding Type – choose one (up/ down/ up or down)
– by default “None” = not active
 Rounding type dropdown selection
* Round up/down = the system will round up or down to the nearest amount (selected in “Rounding Precision”).
c) Rounding Precision – choose one option
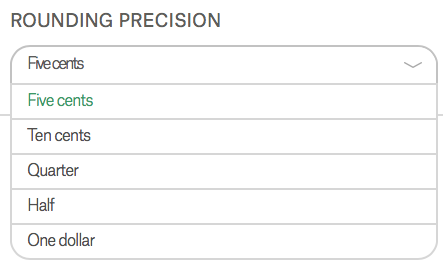
Rounding precision dropdown selection
d) Don’t forget to SAVE your changes at the bottom of the Venue settings. Otherwise, changes will be lost.

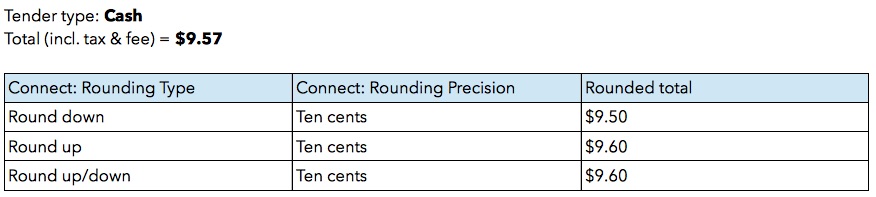
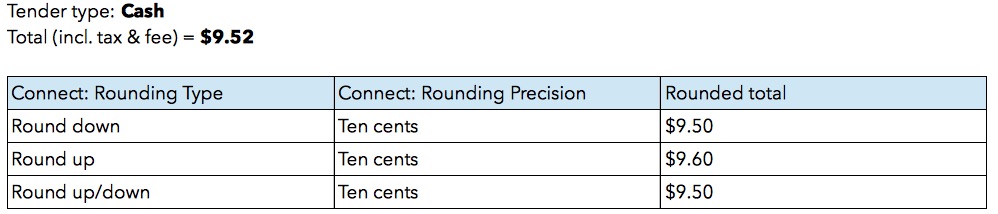
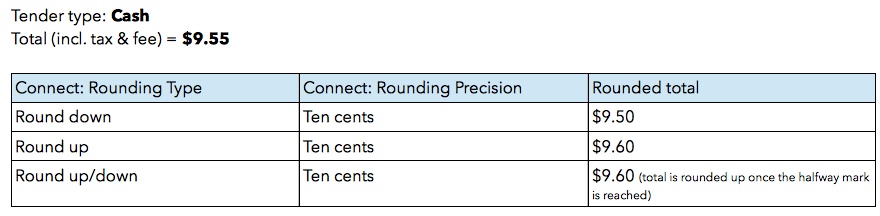
1.3 ROUNDING – HOW TO COUNT IT [ps2id id=’sh1′ target=”/]
See the below tables to find out more on how rounding is counted.
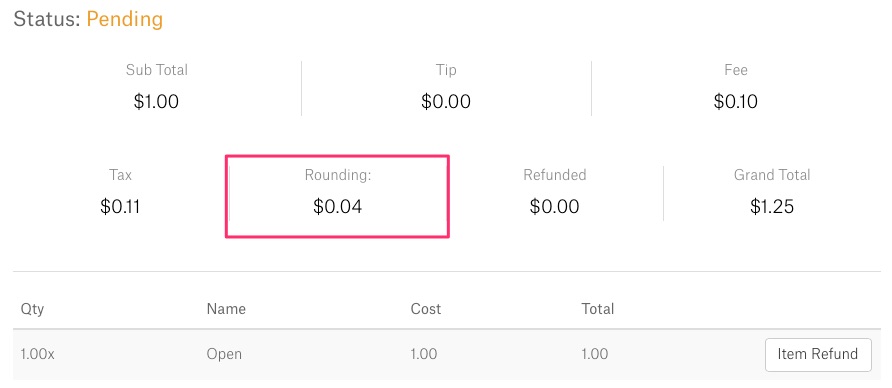
Rounded total = the final value that’ll be displayed on Activate for rounded cash transactions.
1.4 ACTIVATE CHANGES [ps2id id=’chan1′ target=”/]
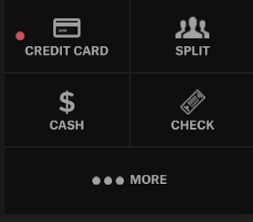
-> if rounding enabled, cash & credit button will be displayed in a form of separate buttons in Activate tender’s view
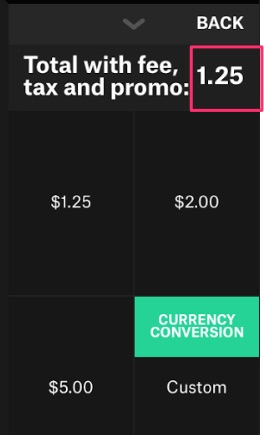
-> The displayed Total when Cash payment is selected should be rounded
Sample setting 1:

And what is going on on Activate:
Item: Avocado, price $1
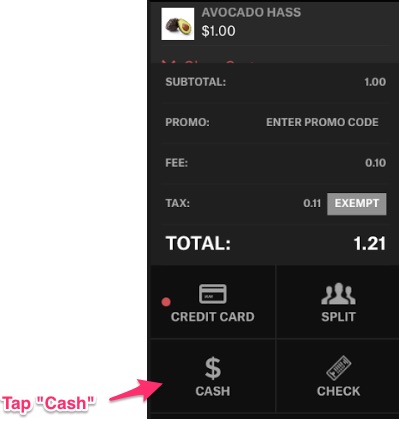
When rounded up to nearest quarter, the final price = $1.25
Sample setting 2:
Item: Avocado, price $1

When rounded down to nearest quarter, the final price = $1.00

Sample setting 3:

When rounded up or down to nearest quarter, the final price = $1.25
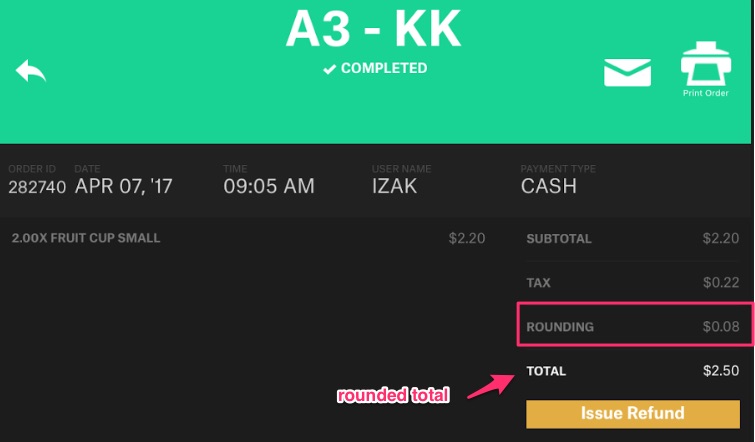
Note! Additionally, the “All Orders” view shows information on the exact amount that has been rounded.
2. Streamline [ps2id id=’tincap1′ target=”/]
2.1 GENERAL INFORMATION [ps2id id=’gentip’ target=”/]
-> Streamline is a loaded value payment type that includes ticket balance to be spent within certain expiration time
-> It works in a form of a purchased ticket (gift card) that is scanned from 1d barcode / entered manually / swiped
-> Example usage: the customer purchases a ticket for the game that comes with $10 of loaded value which can be spent on any items
-> Streamline payment method is supported on Activate iOS in POS modes (regular, splits, easy split) and in REST mode
2.2 CONFIG STEPS – CONNECT / Database [ps2id id=’constepsdab’ target=”/]
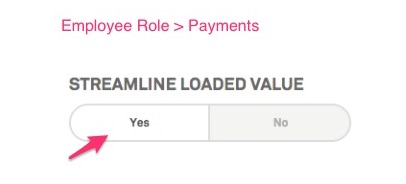
-> enable Streamline on Employee Role> Payments = YES

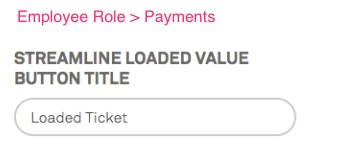
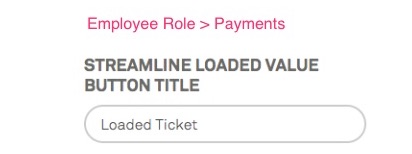
-> you can also customize the name of your TinCaps button
 -> Database: correct settings of Payment type (Loaded Value) and Payment ID for the Venue. For more tech info reach out respective developers
2.3 How it looks in the app – Streamline payment flow [ps2id id=’23d’ target=”/]
POS FLOW – regular transaction
1. Add some items to the cart
2. Choose Tin Caps payment type

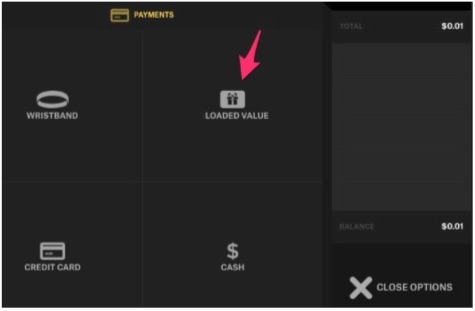
3. Next – you will be asked to enter the amount to be paid.
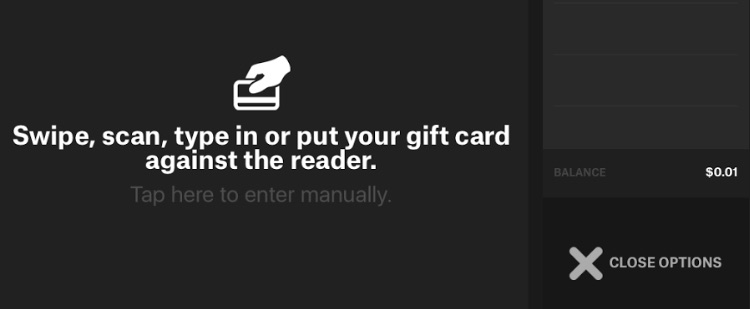
4. After that – provide the card number. This can be done in 3 ways: swipe / enter manually ticket number / scan 1d barcode (barcode scanner must be attached).
5. Choose tip (if applicable).
A sample 1d Tin Caps barcode

6. Finally, tap the green “Complete order” button to finalize your order.
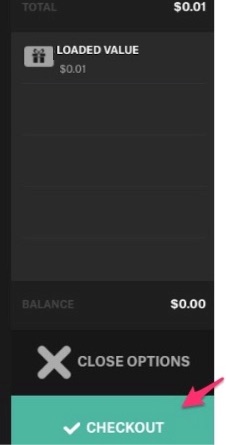
7. Activate will check the balance and if there’re sufficient funds, the item with updated payment type will be displayed in the cart.
If transaction is successul, you will see “Thanks” screen.
Note! For Tin Caps transactions, Signature confirmation screen is not supported.
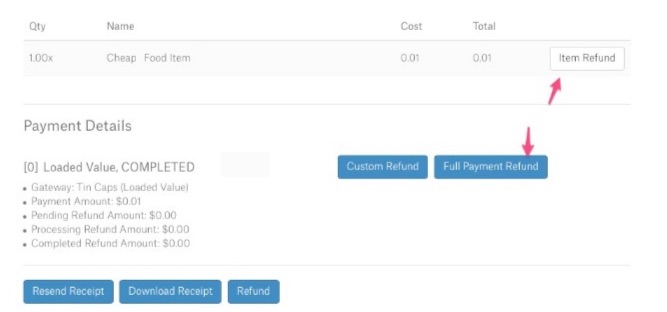
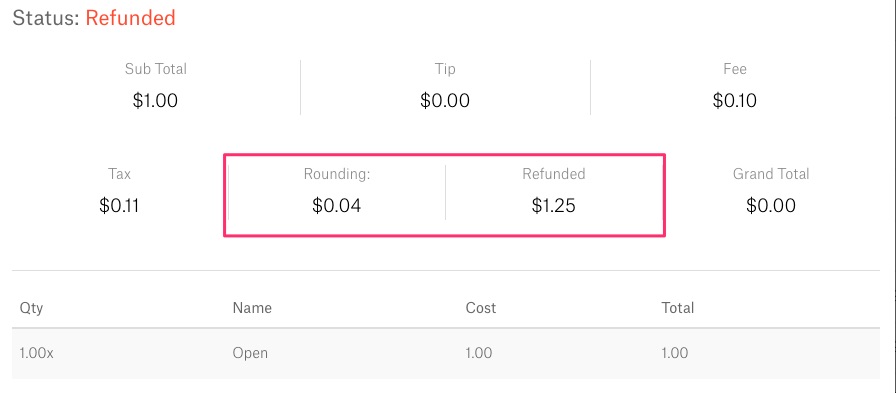
2.4 REFUNDS [ps2id id=’ref24′ target=”/]
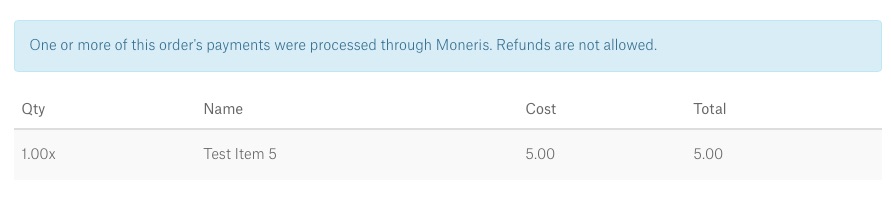
For Streamline Loaded Value, refunds are supported and their flow is like for regular orders.
1. Open Activate’s Left Menu and choose “All Orders” view
2. Choose the order that is to be refunded from “Completed”
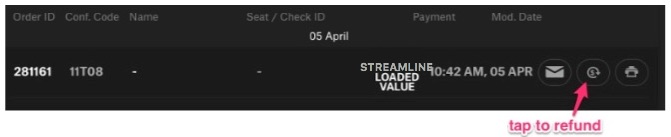
3. Tap the quick refund button and confirm.
4. Result: order goes to the “Refunded” tab.
And, of course, Connect would reflect the status of your order.
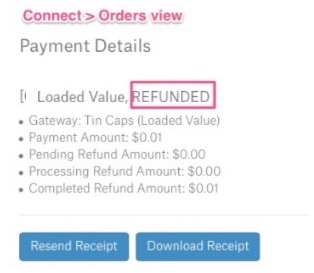
If order has not been refunded yet, Connect would allow to Refund the order / item manually.
2.5 BALANCE CHECK [ps2id id=’bcheck12′ target=”/]
Since Streamline is Loaded Value payment, checking card balance is validated every time payment is made. Additionally, there are a few places where ticket can be checked manually.
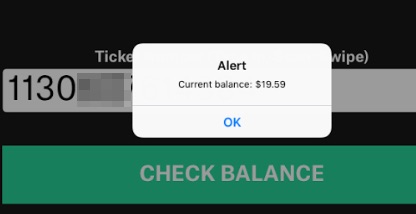
a) Settings Gear – Main View
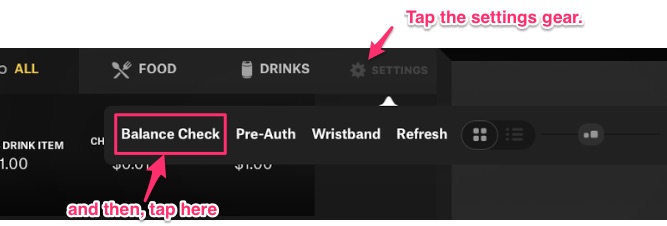
-> enter ticket number manually / scan or swipe window appears
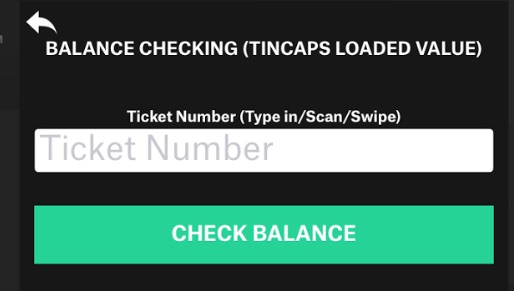
-> see the result
b) Split Mode (regular “Split”).
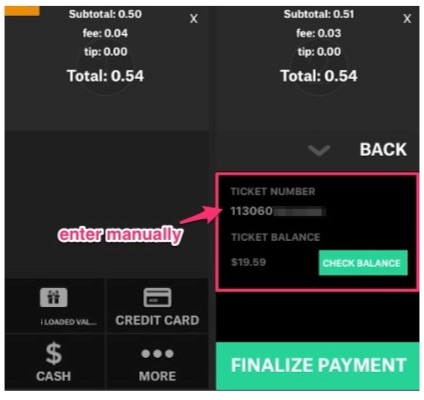
-> Choose “Streamline” Loaded Value for one split payment and check balance
-> Note! Checking balance on Split Mode is possible only by entering ticket number manually
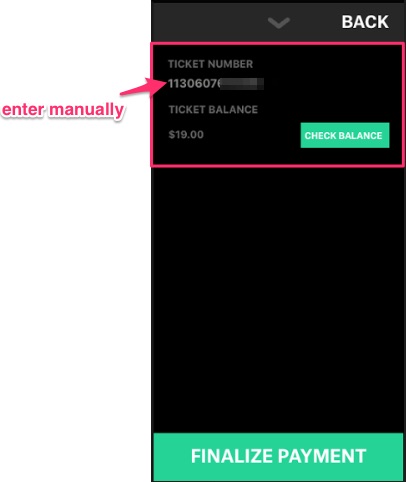
c) Check Orders
-> Add some items to the cart and open Check Order.
-> When finished, tap “Closeout Check” and choose Streamline payment button
-> At this point, it is also possible to check ticket balance
-> Note! Checking balance on Check Orders is possible only by entering ticket number manually
 Rounding type dropdown selection
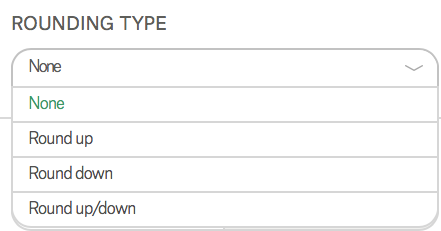


 Example:
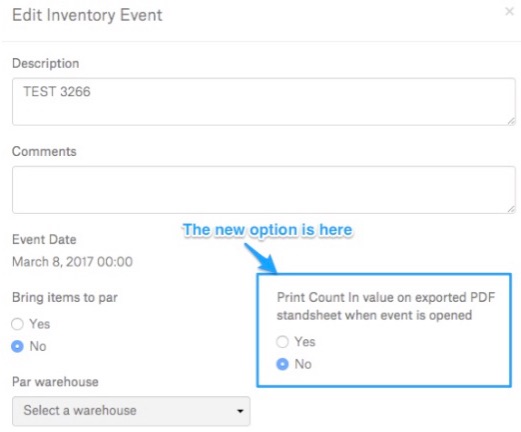
 See the new button “Use Purchase Unit For Par”
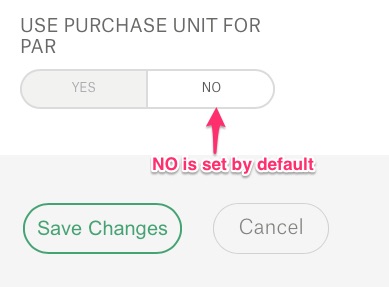
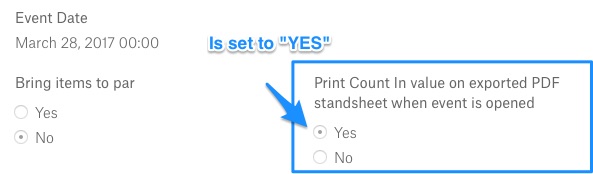
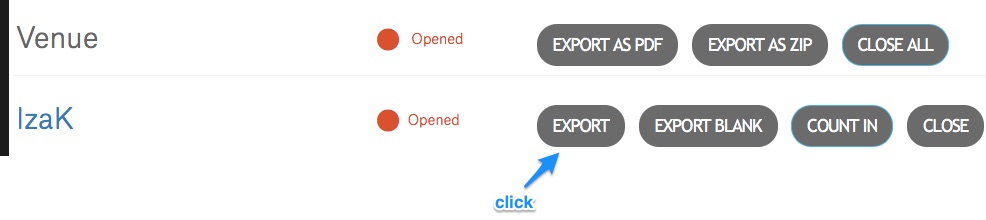
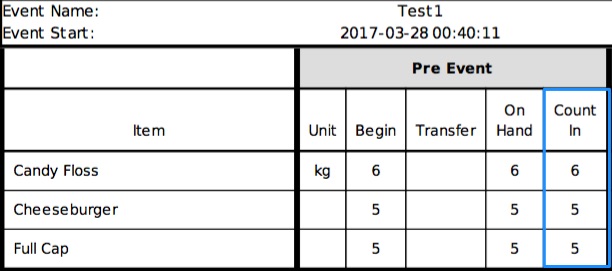
 – a huge PDF file that contains